Using Automated Testing Kit in Your Project - Part 2


If you haven’t read Part 1 of the series, we recommend starting there: Why Use Automated Testing Kit?
In this part, I’ll cover what’s included in the Automated Testing Kit, how the tests are structured, and how to install it yourself. If you’d like to try it without diving into the details, use our demo recipe (text instructions, video instructions). You can also see it in action on Drupal Forge.
What Makes Up Automated Testing Kit?
Automated Testing Kit is a series of tools that work in conjunction with Cypress or Playwright. The Kit is made up of:
- a set of essential smoke tests written in Cypress and Playwright, specifically designed for Drupal
- test framework helper functions, such as logging a user in, communicating with a remote server via Drush and more
- Drupal hooks that make targeting selectors easier
- pre-flight checks that ensure the target server is ready for testing
- and thorough documentation.
The Kit also includes Testor, a command-line snapshot management tool. Testor:
- Stores snapshots on an S3-compatible or SFTP server
- Categorizes snapshots by team function (developers, QA personnel, test server, etc.), and
- Optionally runs sanitization tasks when making the snapshot.
We will discuss Testor in Part 3 of the series.
Should I Choose Cypress or Playwright?
Both tools have distinct strengths and receive regular feature updates. Your choice depends on:
- Are your team members already familiar with one of the frameworks?
- Is your company using one framework in another project and you can share tests and knowledge?
- Is execution speed a top priority? (Playwright has a significant edge here.)
- Are your specific tests easier to write in one framework?
Consult the Learning Resources section of the documentation for guidance on selecting the best framework. Scroll to the video section for recommended comparison videos.
The First Step
Based on your project’s complexity, you may eventually implement testing at every stage outlined in Table 1 from Part 1 of the series. Here is the table again:
| When Should I Use Automated Testing? |
|---|
| During local development, before committing code |
| On every code pull request |
| On every deployment |
| On every API pull request |
| On every API deployment |
| On service deployments |
| When hardware or software dependencies change |
| When feature flags change |
| When there are database changes |
| On scheduled intervals, such nightly or weekly |
Most projects begin by configuring developer machines to run tests against a local version of the site. This setup allows developers and testers to write and execute tests while working on new features or bug fixes. At the beginning of each sprint, one team member creates a snapshot of the production database, sanitizes it (if it contains personally identifiable information) and posts the snapshot where others can get it. (This is where Testor, our snapshot management tool, really comes in handy.)

Refer to the documentation for instructions on installing the Automated Testing Kit on an existing site. Do not use the Demo Recipe on existing sites, as it modifies the configuration and adds demo records.
Installing the Kit is straightforward but involves multiple steps, not all of which are necessary for every project (so feel free to omit pieces).
For example, the QA Accounts module is an optional component of the Kit. The tests assume that accounts provided by this module are available. We use QA Accounts by default because it provides a set of user accounts that can be enabled and disabled simply by enabling and uninstalling the module. Enable the accounts before running tests, then, once testing is complete, uninstall the module, which disabled the QA accounts. While we consider using QA Accounts as a best practice, some teams may prefer using other accounts for testing; that's easy, just modify the contents of the qaUsers.json file.
Targeting Other Servers
Once local testing is operational, the next step is to test against servers that host the website. This includes hosted development, testing/staging environments, and production environments. Note, however, testing on production should only be done after gaining substantial testing experience and thoroughly understanding your tests. Production testing requires careful setup to ensure test data and processes do not disrupt site users.
Here is how it looks when targeting other servers:

With this setup, the process becomes more robust. Expect to make some of the following changes:
- Adjust the site setup for testing on hosted environments.
- Test results can still be viewed on a local machine, but they can also be sent to the Cypress dashboard (when using their cloud service), a test-case management tool such as Testiny, Allure Report or Report Portal.
- Snapshot management becomes more important (which is where Testor comes in, below).
- Many teams trigger tests to run on their CI/CD systems when someone creates a pull request; it's especially useful to use feature-branch preview systems, such as Tugboat, in these cases.
In this phase, establish a business process that the team executes at the beginning of each sprint. This can be as simple as clicking the "Clone" button in your hosting provider’s interface, but it usually involves more steps.
For example, often the database must be sanitized before making it available to the rest of the team. This usually involves removing personally identifiable information (PII). Many teams must comply with both defined company practices and country or regional regulations (such as HIPAA in the USA, PIPEDA in Canada, and GDPR in the European Union). Some accreditations, such as ISO 27001, even define who in the team is authorised to access the original database containing confidential information.
Enterprise projects will expand on the basic setup by adding additional tools that make tasks more efficient and less prone to human error.

Testor
In larger teams, the team often creates scripts to automate routine tasks. When teams use Testor, our command-line snapshot and sanitization tool, the scripts will be greatly simplified.
Some of Testor's features are:
- It creates and uploads snapshots of databases, files, or code to a storage server
- It runs sanitization processes before making snapshots available to others
- It allows testers to retrieve the latest snapshot from the storage server and import it into a target database
- It categorizes snapshots by purpose (e.g., separate snapshots for developers and QA personnel)
- It lists all snapshots stored on the server
- It supports S3-compatible or SFTP servers wherever they are located
- It can be used outside a Drupal installation, which is important when it performs sanitization.
Pre-Flight Verification
Have you ever run a test and accidentally sent emails because you forgot to disable the SMTP module?
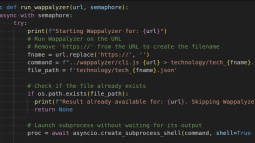
That's why we introduced Pre-Flight Verification. Because the Kit can communicate with the target server, it's able to verify and change configuration on the target server.
If your target server requires specific configuration before a test run, you can add a verification step. The configuration file looks like this:
- command: 'pm:list --format=json'
 json:
   automated_testing_kit.status:
     eq: 'Enabled'
   qa_accounts.status:
     eq: 'Enabled'
   reroute_email.status:
     eq: 'Enabled'
- command: 'config:get reroute_email.settings --format=json'
 json:
   enable:
     eq: true
   address:
     eq: '[email protected]'
   allowed:
     eq: '*@inbox.testmail.app'
Listing 1. A typical atk_prerequisites.yml configuration file. The first command verifies the configuration, and the second one sets the configuration.
You can verify questions such as:
- Is the Reroute Emails module installed and enabled?
- Is a critical data collection module pointing to the test server instead of production?
- Is the search feature directed to a staging search server (with test data) instead of the production one?
If any verification fails, the tests aren't executed.
Running Tests
Once developers can execute tests and target external servers, the next step is to make the process more convenient and reliable.
At this stage, consider setting up a test worker—a server equipped with the tests, Drush, and, if your site is hosted on Pantheon, Terminus. Many teams also install tools such as Cronicle, Jenkins or Rundeck to provide a user-friendly GUI that allows non-technical team members to run tests.

For teams preferring not to maintain a dedicated test worker, tests can be run through a CI/CD system. In the snapshot below for one of our customers, we enhanced the standard run dialog in GitHub, which typically includes only a branch selection dropdown, to also allow:
- choosing the standard target environments (dev, test, live)
- unique, other environments (type in the name)
- the shard count
- tags to pass to the test worker (usually, one always wants to skip tests with a @skip tag)
- the delay to use (often a delay reduces test flakiness over the public internet)
- and the number of retries when tests fail.
It's common to run multiple shards simultaneously, one for desktop, one for tablet, and one for mobile.
The minutes consumed by these runs are deducted from the monthly GitHub allotment.

Integrating Testing Into Pull Requests
When website code is managed in a repository like GitHub, GitLab, or another CI/CD system, it’s common to configure tests to run automatically on every pull request.
This setup ensures that each time a developer submits new code, all the tests are executed against the new branch, thereby quickly identifying whether the changes affect other parts of the system. When test suites become very large and require hours to complete, it's also common to specify just a subset of tests to run against the new feature branch. In this way, developers get results more quickly. When development is complete, someone will run all the tests just before merging to ensure there are no regression problems.
The tests can be executed within the CI/CD system or through a test orchestration system, such as Testiny, Lambda Test and Sauce Labs. By the way, test orchestration systems offer numerous features beyond those typically provided by CI/CD systems and are worth exploring.
Conclusion
In this part of the series, you've learned the typical progression of a team's testing setup. Start small and add new steps only as needed, because creating a thorough but complex setup too early increases the risk of frustration when things go wrong.
In the third and final part of the series, we look at some of the advanced features you can add.
 André AngelantoniProject lead of the Automated Testing Kit, Layout Builder Kit, and Campaign Kit.
Image Attribution Disclaimer: At The Drop Times (TDT), we are committed to properly crediting photographers whose images appear in our content. Many of the images we use come from event organizers, interviewees, or publicly shared galleries under CC BY-SA licenses. However, some images may come from personal collections where metadata is lost, making proper attribution challenging.
Our purpose in using these images is to highlight Drupal, its events, and its contributors—not for commercial gain. If you recognize an image on our platform that is uncredited or incorrectly attributed, we encourage you to reach out to us at #thedroptimes channel on Drupal Slack.
We value the work of visual storytellers and appreciate your help in ensuring fair attribution. Thank you for supporting open-source collaboration!


ASK: Drupal Community Needs Your Support
View all →
Note: The vision of this web portal is to help promote news and stories around the Drupal community and promote and celebrate the people and organizations in the community. We strive to create and distribute our content based on these content policy. If you see any omission/variation on this please reach out to us at #thedroptimes channel on Drupal Slack and we will try to address the issue as best we can.

Related Organizations
Related People


You may also like


")